
Not every drywall hole should be repaired the same way.
A small nail or screw hole may need only a little compound and light sanding.
A medium-sized hole may need reinforcement before you rebuild the surface.
A large hole may require backing, a new piece of drywall, or a more extensive reinforcement system.
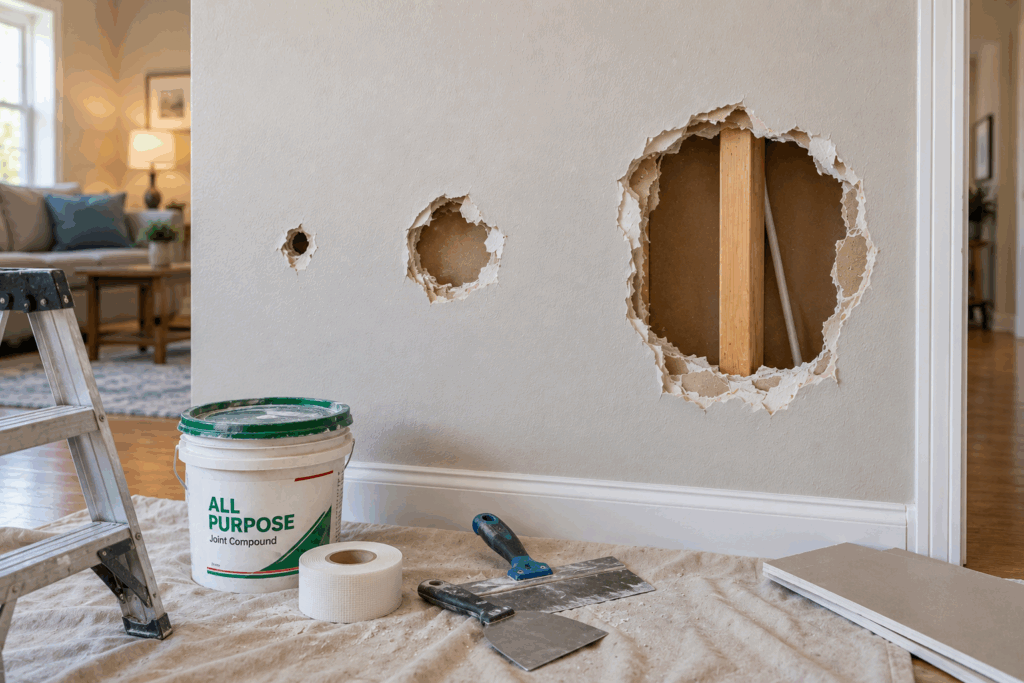
The mistake many homeowners make is using the same repair method for every hole.
That can lead to unnecessary cutting, weak patches, visible repairs, or cracks that show up later.
The better approach is to look at the size and condition of the damage first, then choose the repair method that matches it.
This guide breaks drywall holes into three practical categories—small, medium, and large—and explains what to do with each one.
The Quick Answer: Which Drywall Repair Method Should You Use?
As a general starting point:
| Drywall Hole | Typical Approach | Main Goal |
|---|---|---|
| Small hole | Compound or simple patch | Fill and smooth |
| Medium hole | Reinforcement or patch | Create a stable base |
| Large hole | Backing + drywall patch or reinforced repair | Restore support and rebuild the surface |
These categories are not based on one exact measurement.
A hole’s location, shape, depth, surrounding drywall, and cause of damage can matter just as much as its diameter.
For example, a relatively small hole in loose or damaged drywall may require more work than a larger hole in otherwise solid board.
So don’t choose a repair method based on size alone.
Size tells you where to start. The condition of the surrounding drywall tells you how far the repair needs to go.
What Makes a Drywall Hole Small, Medium, or Large?
There is no universal measurement that perfectly separates every drywall repair into three categories.
For practical DIY purposes, think about the categories this way:
Small drywall holes
These are usually localized holes where most of the surrounding drywall remains intact and supported.
Examples include:
- Nail holes
- Small screw holes
- Small anchor holes
- Minor dents
- Small punctures
These usually require minimal rebuilding.
Medium drywall holes
These are large enough that simply filling the opening with compound is no longer a good solution.
Examples include:
- Larger anchor holes
- Small impact damage
- Small doorknob damage
- Holes with broken or missing drywall around the opening
- Openings that need reinforcement before finishing
These repairs often need some type of support or reinforcement.
Large drywall holes
These are openings where a substantial section of drywall is missing.
Examples include:
- Large impact holes
- Major blowouts
- Holes created when removing fixtures
- Damage that extends across a significant section of a wall
- Openings where a rigid replacement patch makes more sense
These repairs generally require a more structured approach.
The Most Important Rule: Don’t Repair Every Hole the Same Way
Before choosing a patch, ask:
How much drywall is actually damaged?
Then ask:
Is the drywall around the damage still solid?
This second question is extremely important.
A hole may look large but still have strong drywall around it.
Another hole may look relatively small but have cracked, loose, soft, or damaged material extending beyond the visible opening.
If the surrounding board is sound, you may be able to keep the repair localized.
If the surrounding board is compromised, the repair may need to become larger.
This is why the best repair method isn’t simply:
Small hole = method A
Medium hole = method B
Large hole = method C
Instead, think:
Size + condition + location = repair method.
Small Drywall Holes
Small holes are the easiest drywall repairs in most homes.
The goal is usually simple:
Fill the void, smooth the surface, and blend the repair into the wall.
Common Causes of Small Drywall Holes
Small holes can come from:
- Picture hooks
- Nails
- Screws
- Small wall anchors
- Shelves
- Wall decorations
- Minor accidental damage
If the surrounding drywall is firm and there is no hidden moisture or structural issue, these repairs are usually straightforward.
How to Repair a Small Drywall Hole
Step 1: Remove Loose Material
Inspect the hole.
If there is loose paper, crumbling gypsum, or damaged material around the opening, remove or trim it carefully.
The surface should be stable before applying your repair material.
Step 2: Apply Joint Compound or Suitable Repair Material
For a small, shallow hole, apply an appropriate drywall repair compound.
Press the material into the opening rather than simply leaving it sitting on top of the surface.
The objective is to fill the void and create a smooth transition.
Step 3: Scrape the Surface Flush
Use a suitable drywall knife or putty knife to remove excess material.
Try to leave the surrounding wall as clean as possible.
You do not need to create a huge repair area for a tiny hole.
Step 4: Allow It to Dry
Let the repair material dry or set according to the product instructions.
Do not sand or apply another coat prematurely.
Step 5: Sand Lightly
Once ready, sand the repair lightly.
The goal is a smooth surface—not to remove large amounts of material.
Avoid aggressively sanding the surrounding drywall paper.
Step 6: Prime and Paint
If necessary, prime the repaired area before painting.
Then match the surrounding wall’s paint and texture.
For small holes, the finishing stage is often what determines whether the repair disappears.
When a Small Hole Needs More Than a Simple Fill
Don’t assume every small hole can be filled with compound.
You may need to investigate further if:
- The drywall is soft.
- The hole is surrounded by cracks.
- The opening continues to enlarge.
- There is water staining.
- The drywall is loose.
- The hole is located at a damaged seam.
- Something behind the wall caused the damage.
In these situations, the visible hole may not be the actual problem.
Medium Drywall Holes
This is where many DIY repairs go wrong.
A medium-sized hole may look too small to justify cutting out a large section of drywall.
But it may also be too large to simply fill with compound.
That is the point where reinforcement becomes important.
The supplied Reel playbook specifically uses the principle:
“Stop cutting drywall plugs for every medium-sized hole.”
The recommended concept is to check whether the surrounding board is sound, reinforce across the opening, bridge the gap, and widen the finish coat.
Why Medium Holes Are Different
A medium opening creates a larger unsupported area.
If you simply fill that space with a thick layer of compound, the material may not have enough support underneath it.
Instead of asking:
“How do I fill this hole?”
ask:
“How do I create a stable base for the repair?”
That change in thinking makes medium-hole repairs much easier to understand.
How to Repair a Medium Drywall Hole
Step 1: Inspect the Surrounding Drywall
Check the perimeter.
Press gently around the damaged area and look for:
- Loose drywall
- Cracked paper
- Crumbling gypsum
- Additional hidden damage
- Moisture
- Movement
If the surrounding drywall is solid, you may be able to keep the repair relatively localized.
Step 2: Clean the Opening
Remove loose material and prepare the edges.
Do not build a repair over unstable drywall.
A good repair needs a stable surface around the damaged area.
Step 3: Decide Whether You Need a Patch or Reinforcement
This is the key decision.
If the opening can be properly bridged and reinforced while the surrounding board remains sound, a reinforced repair may be appropriate.
If the opening is too large, irregular, or unsupported, a drywall patch with backing may be the better choice.
The objective is not to avoid drywall patches at all costs.
The objective is to avoid making the repair larger than necessary.
Reinforced Repair for a Medium Hole
When using a reinforcement-based method, the basic sequence is:
- Prepare the opening.
- Apply compound around the repair area as appropriate.
- Bridge the opening with suitable reinforcement.
- Work compound into the reinforcement.
- Build the surface gradually.
- Feather the edges wider than the original damage.
- Sand and inspect.
- Prime and paint.
The supplied examples use reinforcement across openings and then build the compound outward to create a broader transition.
The exact reinforcement material should depend on the repair and product system being used.
Do not assume one tape or mesh product is the correct choice for every situation.
Medium Hole With a Drywall Patch
If reinforcement alone is not appropriate, use a drywall patch.
A controlled patch can be easier to finish than trying to rebuild an overly large unsupported opening with compound.
The basic process is:
1. Cut the damaged area to a manageable shape.
2. Add appropriate backing behind the opening.
3. Cut a replacement drywall piece.
4. Secure the replacement piece to the backing.
5. Reinforce the seams.
6. Apply joint compound.
7. Feather the repair outward.
8. Sand, prime, and paint.
This approach creates a more rigid base under the finishing material.
Large Drywall Holes
Large holes require more planning.
At this size, the biggest mistake is treating the opening like a small hole and simply adding more compound.
More compound does not automatically mean more support.
A large opening needs a method that restores a stable base.
Depending on the condition of the wall, that may involve:
- Backing
- A replacement drywall piece
- Reinforcement
- Tape
- Setting-type compound
- Finishing compound
The exact combination depends on the opening.
How to Repair a Large Drywall Hole
Step 1: Inspect the Entire Area
Before cutting anything, examine the damage.
Check:
- The surrounding drywall
- The edges of the opening
- Signs of moisture
- Nearby seams
- The wall’s overall stability
- Anything that may be behind the drywall
Do not assume the visible hole represents the full extent of the damage.
Step 2: Determine Whether the Surrounding Drywall Is Sound
This determines how aggressively you need to enlarge the repair.
If the surrounding drywall is firm, you may be able to keep the repair controlled.
If the surrounding material is damaged, loose, or crumbling, cut back to sound material.
The goal is:
Remove the damaged material—but don’t remove good drywall unnecessarily.
Large Hole Repair With a Backed Drywall Patch
For a large opening that needs a rigid replacement section, a common approach is to create a clean opening and support the new drywall from behind.
The supplied example uses a clean square opening, wood supports behind the drywall, a new drywall piece, seam tape, compound, and wide feathering.
The general sequence is:
1. Mark a clean repair area.
2. Cut out the damaged drywall.
3. Install appropriate backing.
4. Measure and cut the replacement drywall.
5. Secure the new piece.
6. Tape the seams.
7. Apply joint compound.
8. Build additional coats.
9. Feather the edges widely.
10. Sand, prime, texture, and paint.
This method gives the finishing material a solid base instead of asking compound to bridge a large unsupported opening.
Large Hole Repair With Reinforcement
There are also situations where a large localized opening can be repaired using a reinforcement-based approach instead of installing a large replacement piece.
The supplied Reel examples demonstrate this concept by bridging the damaged area with reinforcement, adding additional reinforcement, embedding it in compound, and feathering the finish widely.
The important lesson is not:
“Always use reinforcement instead of drywall.”
It is:
Choose a repair system that gives the damaged area adequate support and a controlled finishing surface.
For very large or structurally unsupported openings, a backed drywall patch may be the more appropriate solution.
Small vs. Medium vs. Large Drywall Holes
Here’s the practical difference.
Small
Main problem: Filling the surface.
Typical solution: Compound or simple patch.
Main concern: Getting the repair smooth enough to disappear under paint.
Medium
Main problem: Creating enough support for the repair.
Typical solution: Reinforcement or a small backed patch.
Main concern: Preventing the repair from becoming weak or overly thick.
Large
Main problem: Restoring a stable base across a substantial opening.
Typical solution: Backing + drywall patch, or an appropriate reinforced repair.
Main concern: Structural support, seam reinforcement, and wide feathering.
Why You Shouldn’t Use a Tiny Patch on a Large Hole
A patch that is too small can leave damaged or unstable drywall around the repair.
It may also create a concentrated transition that is difficult to blend.
The goal is not to use the smallest patch possible.
The goal is to create a stable repair that transitions smoothly into sound drywall.
This is especially important for large openings.
A larger, properly supported repair can sometimes be easier to finish than a tiny repair that leaves weak material around the edges.
Why You Shouldn’t Cut a Huge Patch for Every Hole
The opposite mistake is also common.
Some homeowners see a large-looking hole and immediately cut out a huge square.
But if the surrounding drywall is still solid, unnecessarily enlarging the repair can create:
- More cutting
- More seams
- More compound
- More sanding
- More painting
- More opportunities for visible imperfections
This is why the first question should always be:
How much of the existing drywall actually needs to be removed?
The supplied content repeatedly emphasizes avoiding unnecessary giant drywall patches when the surrounding board can be properly reinforced.
What About Doorknob Holes?
A doorknob hole is a good example of why size alone isn’t enough.
The damage may be relatively localized, but the drywall can be torn, crushed, or weakened around the impact point.
A repair may require reinforcement rather than simply filling the center of the hole.
The supplied playbook treats doorknob holes as a specific repair category because the viewer immediately recognizes the problem.
For this type of damage, inspect the perimeter carefully before deciding how much material to remove.
What About Drywall Blowouts?
A blowout can look dramatic because a large portion of the drywall face may be missing.
But don’t automatically assume you need to replace an enormous section.
First inspect the surrounding board.
If the surrounding drywall is solid, a controlled reinforced repair may be possible.
The supplied Reel examples specifically use the message:
Don’t cut out huge squares for every blowout.
Instead, they demonstrate reinforcing and bridging the damaged area before building the finish.
For more extensive damage, however, a backed drywall patch may provide a more predictable base.
The Bigger the Hole, the More Important the Finish Becomes
Large repairs have another problem:
They create a larger area that the eye can inspect.
A small hole can disappear under a few square inches of compound.
A large repair can remain visible because of:
- Uneven feathering
- High spots
- Low spots
- Visible seams
- Poor sanding
- Texture differences
- Paint sheen differences
This is why the finishing stage should be treated as part of the repair—not an afterthought.
Feathering: The Key to a Better-Looking Repair
Feathering means gradually thinning the compound as you move away from the repair.
Instead of creating:
thick repair → hard edge → original wall
you want:
thick center → gradual transition → original wall
For larger repairs, use a wider knife and extend the transition farther into the surrounding wall.
The supplied Reel examples specifically recommend widening the finish with a larger knife for a smoother transition.
This can make a major difference after painting.
Don’t Just Sand the Center
A common finishing mistake is sanding until the center feels smooth while ignoring the perimeter.
The edges are often where the repair becomes visible.
Check:
- The center
- The edges
- The feathered transition
- The surrounding wall
Use side lighting if possible.
Light coming across the wall can reveal imperfections that are difficult to see straight on.
How Many Coats of Compound Should You Use?
There is no single number that applies to every drywall repair.
The number of coats depends on:
- Hole size
- Repair method
- Compound type
- Depth of the repair
- Width of the feathered area
- Surface condition
Instead of trying to finish the entire repair in one thick application, build the surface gradually.
This gives you more control over the final shape.
When Should You Use Setting-Type Compound?
Setting-type compounds can be useful for establishing a repair base because they harden through a setting process rather than relying entirely on air drying.
They are commonly used in professional drywall repair workflows for certain stages of a repair.
However, the appropriate product depends on the repair and the manufacturer’s instructions.
Do not assume every compound should be used interchangeably.
For the final finish, a finishing compound may provide easier sanding and surface refinement depending on the system being used.
What Materials Do You Need?
Your materials depend on the size of the hole.
Small hole
You may need:
- Putty knife or small drywall knife
- Joint compound or suitable repair compound
- Sanding sponge or sandpaper
- Primer
- Matching paint
Medium hole
You may need:
- Drywall knife
- Joint compound
- Appropriate reinforcement
- Tape or mesh where appropriate
- Sanding tools
- Primer
- Paint
Large hole
You may need:
- Utility knife or drywall saw
- Replacement drywall
- Appropriate backing
- Drywall screws
- Drywall tape
- Joint compound
- Setting-type compound where appropriate
- Wider drywall knives
- Sanding tools
- Primer
- Matching texture
- Paint
You don’t necessarily need every item on this list for every repair.
The repair method determines the materials.
How to Choose Between Reinforcement and a Drywall Patch
Ask these questions:
Is the surrounding drywall solid?
If yes, a localized reinforced repair may be possible.
Is a large section missing?
If yes, a replacement drywall section may make more sense.
Can the opening be properly supported?
If no, you need to create support before finishing.
Is the existing drywall around the opening damaged?
If yes, remove or repair the compromised material before building the finish.
Is the repair near a seam or transition?
If yes, movement and reinforcement become especially important.
Is there moisture?
If yes, fix the moisture source before treating the drywall as a simple cosmetic repair.
When a Drywall Hole Is Actually a Bigger Problem
Sometimes the hole is only the symptom.
Stop and investigate if you notice:
- Water stains
- Soft drywall
- Persistent dampness
- Mold
- Significant cracking
- Repeated damage in the same area
- Loose framing
- Structural movement
- Damaged electrical wiring
- Plumbing problems
A cosmetic repair cannot solve an active leak or structural problem.
If the underlying issue remains, the drywall repair may fail again.
What If the Repair Cracks After You Finish It?
Don’t simply add another layer of compound.
Ask why it cracked.
Possible causes include:
- Movement
- Loose drywall
- Poor reinforcement
- Failed tape
- Excessively thick compound
- Moisture
- Movement between different surfaces
The same principle applies to holes and cracks:
Fix the underlying problem before repeatedly repairing the surface.
A repair that looks perfect today can still fail later if the base underneath it remains unstable.
The Most Common Drywall Hole Repair Mistakes
1. Treating every hole the same
A small nail hole and a large impact hole do not require the same repair system.
2. Using compound as structural support
Compound is a finishing material.
Large unsupported openings need an appropriate support or reinforcement strategy.
3. Cutting out too much drywall
Don’t create a massive patch simply because the hole looks dramatic.
Inspect the surrounding board first.
4. Using a patch that is too small
A tiny patch can leave weak or damaged material around the repair.
5. Skipping reinforcement
Medium and large repairs may require reinforcement depending on the method.
6. Applying one extremely thick coat
Build the repair gradually.
7. Feathering too narrowly
A large repair generally needs a wider transition.
8. Sanding aggressively
Over-sanding can damage the surrounding drywall paper.
9. Painting before the surface is ready
Paint won’t fix ridges, low spots, or visible seams.
10. Ignoring the cause of the damage
If moisture or movement caused the damage, repairing the surface alone may not solve the problem.
A Simple Decision Tree for Drywall Holes
Use this before you start cutting.
Is the hole small and shallow?
Yes → Start with a simple fill or small patch.
Is the hole larger but the surrounding drywall is solid?
Yes → Consider reinforcement or a controlled patch.
Is a substantial section missing?
Yes → Consider a backed drywall patch or another appropriately supported repair system.
Is the surrounding drywall damaged?
Yes → Extend the repair to sound material.
Is there moisture or structural damage?
Yes → Address the underlying problem before treating the hole as a cosmetic repair.
Are you unsure what is behind the wall?
Yes → Work cautiously and investigate before cutting or fastening.
How to Make Any Drywall Hole Repair Less Visible
Regardless of hole size, the finishing principles are similar.
1. Start with a stable base
Don’t build a beautiful finish over unstable drywall.
2. Use the appropriate reinforcement
Match the reinforcement to the repair.
3. Build gradually
Avoid trying to create the final surface in one thick coat.
4. Feather wide
The transition should gradually disappear into the surrounding wall.
5. Sand carefully
Remove ridges without damaging the surrounding drywall.
6. Inspect with side lighting
Look for imperfections before paint.
7. Prime appropriately
Prepare the repaired surface for paint.
8. Match the texture
Smooth drywall next to textured drywall will still look like a repair.
9. Match the paint
Color and sheen both affect the final appearance.
Small vs. Medium vs. Large: The Homeowner’s Cheat Sheet
If you only remember one section from this guide, remember this:
SMALL HOLE
Think: Fill and finish.
Check the surrounding drywall, fill the opening, smooth it, and paint.
MEDIUM HOLE
Think: Support and reinforce.
Don’t automatically cut a giant patch. Check whether the surrounding drywall is solid and determine whether reinforcement or a controlled patch is appropriate.
LARGE HOLE
Think: Restore the base.
A large opening usually needs a more structured repair with appropriate backing, a drywall patch, reinforcement, or a combination of methods.
EVERY HOLE
Think: Inspect first.
The size of the visible hole is only one part of the decision.
Final Thoughts
The best drywall repair isn’t necessarily the one that uses the most material or creates the biggest patch.
It is the one that matches the size, condition, and location of the damage.
Small holes can often be handled with a simple fill and finish.
Medium holes may need reinforcement or a controlled patch.
Large holes usually require a stronger plan for restoring support before the final surface is built.
And before you cut anything, remember one rule:
Don’t make the repair bigger than the damage requires—but don’t leave damaged or unsupported drywall underneath the repair either.
Inspect the surrounding board.
Choose the right repair system.
Build the surface gradually.
Feather the edges wide.
Sand carefully.
Then prime, texture, and paint.
That approach gives you a much better chance of ending up with a repair that blends into the wall instead of creating a new, obvious patch.
Frequently Asked Questions
What size drywall hole can I repair without replacing the wall?
There is no single maximum size that applies to every situation.
The surrounding drywall, location, shape, and condition of the damage all matter.
A large localized hole may be repairable without replacing the entire wall if the surrounding drywall remains sound and the opening can be properly supported.
Should I always use a drywall patch for a large hole?
No.
A large hole may sometimes be repaired with an appropriate reinforcement system when the surrounding drywall is sound.
In other situations, a backed drywall patch provides a more rigid and predictable base.
Choose the method based on the actual condition of the repair.
Can I fill a medium drywall hole with joint compound?
Not if the opening is too large to support the compound properly.
Medium openings often need reinforcement or another form of support.
The key question is whether the compound has a stable base underneath it.
Do small drywall holes need tape?
Not necessarily.
Very small holes can often be filled without tape.
Larger or structurally more demanding repairs may require reinforcement depending on the repair method.
Why does my drywall patch keep cracking?
Recurring cracks can result from movement, loose drywall, poor reinforcement, failed tape, thick compound, moisture, or another underlying issue.
If a repair repeatedly cracks, don’t simply cover the crack again.
Investigate what is causing the movement or failure.
Why can I still see my drywall repair after painting?
Common causes include:
- Poor feathering
- Uneven sanding
- High or low spots
- Visible seams
- Texture mismatch
- Paint color mismatch
- Paint sheen differences
A repair needs to be properly prepared before paint.
Should I cut a square around every drywall hole?
No.
A clean rectangular opening can make some repairs easier, especially when installing a backed drywall patch.
But cutting a large square around every hole can create unnecessary work.
Inspect the surrounding drywall first and remove only what needs to be removed.
What is the most important thing to check before repairing a drywall hole?
The condition of the surrounding drywall.
If the surrounding board is solid, you may be able to keep the repair localized.
If it is loose, soft, cracked, or damaged, the repair may need to extend beyond the visible hole.
Related Drywall Repair Guides
How to Repair a Large Drywall Hole Without Replacing the Whole Wall
A deeper guide to choosing between reinforcement and a backed drywall patch for large openings.
Why Does My Drywall Repair Keep Cracking?
Find out why a repair can fail after looking perfectly smooth.
How to Repair a Doorknob Hole in Drywall
A focused guide for one of the most common types of impact damage.
Why Does My Drywall Patch Still Show After Painting?
Learn how feathering, sanding, primer, texture, and paint affect the final result.
How to Make Drywall Repairs Disappear Under Paint
A finishing-focused guide for getting a smoother, less noticeable repair.
How to Fix Drywall Anchor Holes
A practical guide for holes left behind after removing shelves, pictures, and wall-mounted items.
Drywall Blowout Repair Guide
Learn how to approach large blowouts without automatically turning them into an unnecessarily large drywall replacement.