
A large hole in drywall can make it look like an entire section of the wall needs to be replaced.
But that is not always the case.
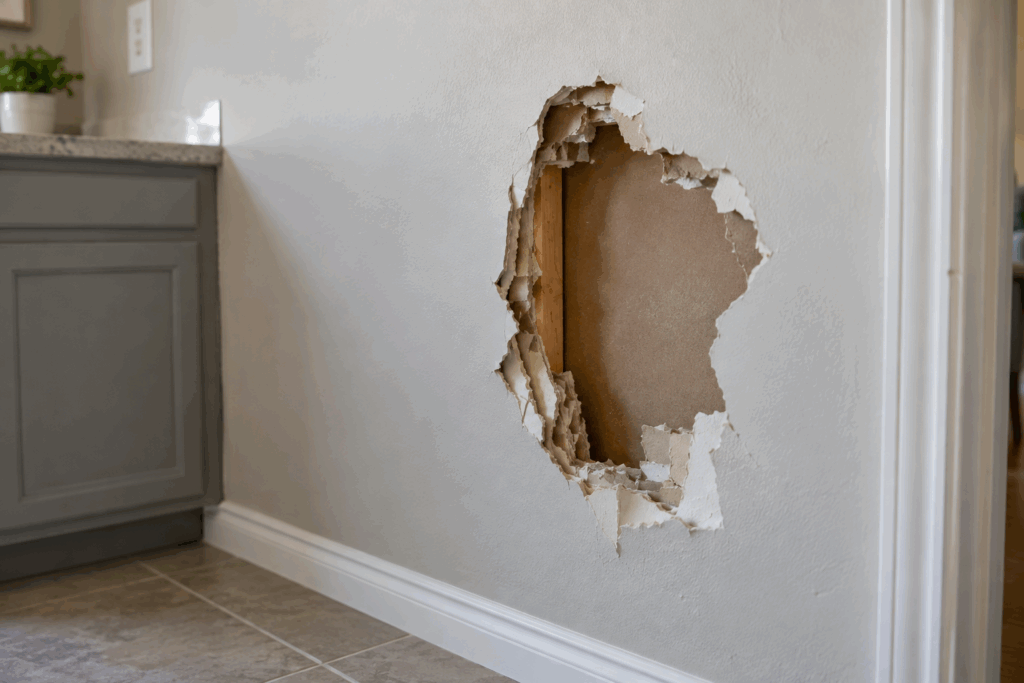
If the drywall surrounding the damage is still solid, the repair may be much smaller than it looks. Depending on the size, shape, and location of the hole, you may be able to stabilize the opening, add proper backing or reinforcement, rebuild the damaged area with joint compound, and blend the repair into the surrounding wall.
The important part is knowing when a large hole can be repaired and when the damaged drywall actually needs to be removed and replaced.
This guide explains how to evaluate the damage, choose the right repair approach, reinforce the opening, rebuild the surface, and finish it so the repair is much harder to see after painting.
Can You Repair a Large Drywall Hole Without Replacing the Whole Wall?
Yes, in many situations.
A large hole does not automatically mean you need to remove an entire sheet of drywall.
The first thing to check is the condition of the drywall around the opening.
If the surrounding board is firm, the damage is localized, and there is no evidence of a larger moisture or structural problem, you may be able to repair only the damaged area.
However, the larger the hole becomes, the more important support and reinforcement become.
A small hole can sometimes be filled directly.
A medium hole may require reinforcement or backing.
A large opening may require a combination of backing, a drywall patch, tape, mesh, and several layers of compound.
The goal is not simply to cover the hole.
The goal is to create a stable repair that can support the finishing material and transition smoothly into the existing wall.
When You Should NOT Just Patch the Hole
Before reaching for joint compound, inspect the damage.
A large hole should not be treated as a simple cosmetic repair if there is an underlying problem.
Look for:
- Water stains or signs of moisture
- A plumbing or roof leak
- Soft or crumbling drywall
- Loose drywall around the opening
- Significant movement in the surrounding wall
- Damaged framing
- Electrical or plumbing components inside the wall
- Mold or persistent dampness
- A hole that is continuing to expand or crack
If moisture caused the damage, fix the source first.
If the framing or surrounding structure is damaged, the drywall repair should not be considered the main problem.
And if you are unsure what is behind the wall, be careful when cutting or driving screws into the area.
The first rule of a large drywall repair is simple: make sure the damage is actually limited to the drywall.
Why Large Drywall Holes Are Harder to Repair
The biggest problem with a large hole is not the hole itself.
It is the unsupported area.
Joint compound is designed for finishing and filling. It is not a replacement for missing structural support.
When a large opening is simply filled with compound, the material can shrink, sag, crack, or fail because there is nothing substantial underneath it.
That is why large repairs need some form of support or reinforcement.
Depending on the repair, this may include:
- Drywall backing
- Wood supports
- Drywall patch material
- Paper tape
- Fiberglass or mesh reinforcement
- Setting-type joint compound
- Finishing compound
The exact combination depends on the size and location of the opening.
How to Repair a Large Drywall Hole
Step 1: Inspect the Damage
Start by examining the entire damaged area.
Do not focus only on the visible hole.
Press gently around the edges and check whether the surrounding drywall feels solid.
You are looking for a clear boundary between the damaged area and the sound drywall.
If the surrounding board is soft, loose, badly cracked, or damaged by moisture, the repair may need to extend farther.
Also check whether the hole is near:
- A corner
- A drywall seam
- A ceiling-to-wall transition
- A door
- A window
- A known framing location
The location matters because some areas experience more movement than others.
Step 2: Decide Whether You Need a Drywall Patch
This is one of the most important decisions in the repair.
There are two general approaches for a large opening.
Option 1: Reinforced surface repair
If the surrounding drywall is sound and the opening can be properly bridged and reinforced, a repair can sometimes be built up using reinforcement and compound rather than installing a large replacement piece of drywall.
This is the approach demonstrated in several of the supplied repair examples: reinforce across the opening, work compound into the reinforcement, then build and feather the repair outward.
Option 2: Backed drywall patch
If the opening is too large or the missing section needs more rigid support, cut the damaged area back to a manageable shape and install a new piece of drywall over solid backing.
One of the supplied large-hole examples uses this approach: create a clean square opening, install wood supports behind it, secure a new drywall piece to the backing, tape the seams, and feather the finishing compound outward.
Neither approach is automatically right for every hole.
The condition of the surrounding drywall should determine the method.
Method 1: Repairing a Large Hole With Reinforcement
This approach is useful when the surrounding drywall is solid and the repair can be properly supported by reinforcement.
It is particularly useful for situations where cutting an unnecessarily large section out of the wall would create more work than the original damage requires.
Step 3: Clean and Prepare the Opening
Remove loose pieces of drywall, torn paper, and material that is no longer firmly attached.
The edges should be stable enough for the repair material to bond properly.
Avoid leaving loose paper or crumbling gypsum underneath your new compound.
The cleaner the opening, the easier it will be to control the repair.
Step 4: Prepare the Perimeter
Apply a layer of joint compound around the perimeter of the damaged area.
The supplied repair examples describe “buttering” the edges with mud before bridging the opening with reinforcement.
The purpose is to create a workable bed for the reinforcement and begin building the transition.
Do not try to fill the entire hole with a thick mound of compound at once.
Build the repair in controlled layers.
Step 5: Bridge the Opening With Reinforcement
Place reinforcement across the damaged area so the opening is bridged rather than left unsupported.
The supplied examples use fiber tape and wider mesh reinforcement in multiple directions.
The important concept is that the reinforcement spans the damaged area and gives the compound something to lock into.
For a large repair, the reinforcement should extend beyond the immediate opening rather than stopping exactly at the edge.
This helps distribute the transition over a larger area.
Step 6: Work Joint Compound Into the Reinforcement
Apply joint compound over the reinforcement and work it through the material so it becomes integrated into the repair.
Do not try to achieve the final surface thickness in one coat.
Instead:
- Establish the base.
- Lock the reinforcement into the compound.
- Allow the material to set or dry as appropriate.
- Add additional coats.
- Gradually widen the repair.
The supplied large-hole Reel follows this basic progression: compound around the perimeter, reinforcement across the opening, additional reinforcement, then a wide skim coat.
Method 2: Repairing a Large Hole With a Drywall Patch
For a larger opening where a rigid replacement section makes more sense, use a backed drywall patch.
This method creates a new piece of drywall to replace the missing section while keeping the repair localized.
Step 3: Mark a Clean Repair Area
Instead of trying to repair an irregular, torn opening, mark a clean shape around the damage.
A square or rectangular opening is often easier to work with because it gives you straight edges and predictable backing locations.
Make the opening large enough to remove loose and damaged drywall, but do not remove more of the wall than necessary.
This is the key difference between a controlled repair and unnecessarily enlarging the job.
Step 4: Cut Out the Damaged Drywall
Use a utility knife or appropriate drywall-cutting tool to cut along the marked lines.
Work carefully.
Before cutting deeply into the wall, consider what may be behind the drywall.
Electrical wiring, plumbing, and other components can be hidden inside walls.
Once the damaged section is removed, clean the edges and make sure the remaining drywall is solid.
Step 5: Add Backing Behind the Opening
A replacement drywall piece needs something solid to attach to.
Install wood backing behind the opening so the new drywall has a stable base.
The supplied large-hole example uses 2 × 3 wood supports behind the opening before attaching the new drywall piece.
The exact backing material and dimensions should be appropriate for the opening and the existing wall construction.
The objective is straightforward:
The replacement piece should not be floating inside the hole.
It needs secure support around its edges.
Step 6: Cut the Replacement Drywall
Measure the opening and cut a replacement piece to fit.
Aim for a controlled fit without forcing the drywall into place.
The new piece should sit securely against the backing.
Avoid creating an unnecessarily large gap around the patch because excessive filling makes finishing more difficult.
Step 7: Secure the New Drywall
Position the replacement piece against the backing and fasten it securely.
The surface should sit approximately flush with the surrounding drywall.
Do not leave the patch proud of the existing wall.
At the same time, avoid driving fasteners so aggressively that they damage the paper face of the drywall.
The goal is a firm, controlled surface that can be finished.
How to Reinforce the Seams
Installing the drywall patch is only the middle of the repair.
The seams around the new piece are where the repair transitions into the original wall.
That transition needs to be reinforced and finished properly.
Step 8: Apply Joint Tape
Apply the appropriate drywall tape over the seams.
The supplied large-hole repair example specifically uses paper tape with Easy Sand compound before feathering the repair outward.
Tape helps reinforce the joint between the existing drywall and the new piece.
Do not simply cover the seam with a thick layer of compound and assume the problem is solved.
A visible seam under the paint can be caused by poor reinforcement, insufficient feathering, or an uneven transition.
Step 9: Apply the First Coat
Apply a controlled first coat of joint compound over the taped seams.
At this stage, focus on embedding the tape and establishing a smooth base.
Do not try to make the entire repair perfect in one pass.
Large repairs are easier to finish when the material is built gradually.
Step 10: Add Wider Coats
After the first coat has set or dried appropriately, apply additional compound.
Each coat should extend farther from the center of the repair.
This is where feathering becomes extremely important.
A repair can be structurally sound and still look terrible after painting if the transition is too narrow.
The Secret to Making a Large Drywall Repair Disappear
The final appearance is usually determined less by how much compound you use and more by how gradually you transition from the repaired area to the original wall.
That transition is called feathering.
Instead of creating a hard ridge around the patch, spread the compound farther outward and gradually reduce the thickness toward the existing wall.
For larger repairs, use a wider drywall knife when appropriate.
The supplied Reel examples specifically emphasize feathering the edges wide with a larger knife to create a smoother transition.
Think of the repair as a shallow hill rather than a mound.
The center can be built up where necessary.
The edges should become progressively thinner.
How Wide Should You Feather a Large Drywall Repair?
There is no single width that works for every repair.
The larger and more visible the repair, the more gradual the transition generally needs to be.
For a small repair, the feathered area may be relatively compact.
For a large repair, extending the compound farther into the surrounding wall can make the transition much less noticeable.
The goal is not to create the smallest possible patch.
The goal is to create the smoothest possible transition.
Step 11: Let the Compound Set or Dry
Do not rush the next coat.
Depending on the product being used, joint compound may need to set or dry before additional coats can be applied.
Follow the product instructions.
Applying another coat too early can disturb the underlying material and make the surface harder to finish.
Patience is especially important on large repairs because thick areas of compound take longer to dry.
Step 12: Sand the Repair Carefully
Once the compound is ready, sand the repair lightly.
Do not focus only on the center.
Pay close attention to the transition between the repaired area and the original wall.
The purpose of sanding is to remove ridges and imperfections while preserving the gradual feathered transition.
Over-sanding can damage the paper face of the surrounding drywall and create another problem.
Use enough sanding to smooth the surface without aggressively removing the surrounding wall.
Step 13: Check the Repair From the Side
One of the easiest ways to miss a drywall imperfection is to inspect the wall straight on under normal lighting.
Use light from the side of the wall if possible.
Side lighting can reveal:
- High spots
- Low spots
- Knife marks
- Ridges
- Uneven feathering
- Edges around the patch
If you can see a hard transition before painting, there is a good chance the paint will not magically hide it.
Fix the surface first.
Step 14: Apply Primer Before Painting
Once the repair is smooth and ready, apply primer to the repaired area as appropriate for the products you are using.
Priming helps prepare the repaired surface for paint and can help prevent differences in how the repair and surrounding wall absorb the finish.
Do not treat primer as a substitute for proper surface preparation.
If the repair is visibly uneven before primer, it will still be uneven afterward.
Step 15: Match the Existing Wall Texture
A smooth drywall repair can still stand out if the surrounding wall has texture.
Before painting, look at the existing surface.
Is it:
- Smooth?
- Lightly textured?
- Heavily textured?
- Orange-peel?
- Another decorative finish?
The repair needs to match the surrounding surface as closely as practical.
Texture matching is especially important when the repaired area is large because a large smooth patch can become obvious even when the compound itself is perfectly sanded.
Step 16: Paint the Repair
Once the repair has been properly prepared, primed, and textured if necessary, paint it to match the surrounding wall.
For the best visual result, the goal is not simply to make the hole disappear.
The entire repaired area should visually transition into the original wall.
If the paint color or sheen does not match, the repair may remain visible even when the drywall work is excellent.
Common Mistakes When Repairing Large Drywall Holes
Mistake #1: Filling a Large Hole With Compound Alone
Joint compound is not a substitute for support.
Large unsupported areas need appropriate backing or reinforcement.
Trying to bridge a large opening with a thick mass of compound can create a weak repair.
Mistake #2: Cutting Out More Drywall Than Necessary
A large hole can tempt you to cut an enormous square around the damage.
Sometimes that is the right approach.
Sometimes it simply turns a localized repair into a much larger patch.
Check the surrounding drywall first.
If the remaining board is solid, consider whether the repair really needs to be enlarged.
The supplied Reel strategy specifically uses the idea of avoiding unnecessarily large drywall plugs when the surrounding area can be properly reinforced.
Mistake #3: Skipping Reinforcement
A repair may look smooth immediately after applying compound and still fail later.
The repair needs an appropriate base.
Depending on the method, that may mean backing, drywall support, tape, mesh, or another suitable reinforcement system.
The exact reinforcement method should match the repair rather than being applied automatically to every hole.
Mistake #4: Using Too Much Compound at Once
A thick layer may take longer to dry and can make the surface harder to control.
Build the repair gradually.
Thin, controlled coats make it easier to establish a smooth transition.
Mistake #5: Feathering Only Around the Immediate Hole
This is one of the most common finishing problems.
If the compound stops too close to the original damage, the repair can create a visible mound or edge.
Large repairs generally benefit from a wider transition.
The supplied examples repeatedly emphasize widening the finish with a large knife rather than keeping the repair tight around the opening.
Mistake #6: Sanding Only the Center
The center may feel perfectly smooth while the edges remain visible.
Inspect and sand the transition.
That is where the eye is most likely to detect a repair after painting.
Mistake #7: Painting Before the Surface Is Ready
Paint is not a drywall repair material.
It will not reliably hide:
- Ridges
- Hard edges
- Uneven surfaces
- Poor feathering
- Low spots
- Visible tape
Get the surface right before you paint.
Large Drywall Hole: Patch or Reinforce?
Use this simple decision guide.
Consider reinforcement when:
- The surrounding drywall is solid.
- The damage is localized.
- The opening can be properly bridged.
- You can create a stable base for the compound.
- A replacement patch would unnecessarily enlarge the repair.
Consider a backed drywall patch when:
- The opening is very large.
- A substantial section of drywall is missing.
- The repair needs rigid support.
- The surrounding edges need to be cut back to solid material.
- A replacement piece will create a more controlled repair.
Stop and investigate further when:
- There is moisture.
- The drywall is soft or crumbling.
- The framing is damaged.
- The wall is moving significantly.
- The damage appears to be structural rather than cosmetic.
- You are unsure what is behind the wall.
How to Tell If Your Large Drywall Repair Is Strong Enough
Before finishing the repair, check the base.
Ask:
- Is the surrounding drywall solid?
- Is the damaged area properly supported?
- Is the reinforcement securely embedded?
- Is the replacement patch firmly attached if one was used?
- Are the seams properly reinforced?
- Is the compound being applied in controlled layers?
- Are the edges feathered gradually?
- Does the repair remain stable as the compound sets?
A smooth surface is not enough.
The repair needs a sound base underneath the finish.
What If the Large Drywall Repair Cracks Again?
If a large repair cracks after completion, do not automatically cover the crack with another layer of compound.
First ask why it cracked.
Possible causes include:
- Movement in the wall
- Loose drywall
- Poor reinforcement
- Failed or missing tape
- Excessively thick compound
- Moisture
- Movement between different surfaces
- A larger structural or framing issue
Repeatedly adding more compound may temporarily hide the crack without addressing the reason it appeared.
This is especially important around ceilings, joints, beam intersections, and other locations where different parts of the structure can move at different rates.
If the crack keeps returning, investigate the underlying condition before simply repairing the surface again.
Can You Repair a Large Drywall Hole Yourself?
Many homeowners can handle a large drywall repair if they are comfortable with cutting drywall, installing backing, applying joint compound, taping seams, sanding, and painting.
The difficult part is usually not the first coat.
It is getting the final transition to disappear.
A repair can be technically complete and still look obvious because of:
- Poor feathering
- Uneven sanding
- Incorrect texture
- Paint mismatch
- A visible seam
- A high or low spot
If you are comfortable working carefully and allowing enough time for each stage, a large drywall repair can be a manageable DIY project.
But if the damage involves moisture, structural movement, extensive framing damage, or hidden utilities, the problem may go beyond a simple drywall repair.
How Long Does a Large Drywall Repair Take?
The actual working time depends on the size of the hole, the repair method, the number of coats required, the compound being used, and drying or setting time.
The physical application may be relatively quick.
The complete project can take longer because each stage may require additional setting or drying time.
A typical repair process may involve:
- Inspection
- Preparation
- Backing or reinforcement
- First coat
- Additional coats
- Feathering
- Sanding
- Inspection
- Primer
- Texture matching if needed
- Painting
Do not rush the finishing stages simply because the hole itself has already been filled.
Large Drywall Hole Repair Checklist
Before calling the repair finished, run through this checklist:
Before repairing
- The source of the damage has been identified.
- There are no obvious moisture problems.
- The surrounding drywall is solid.
- The repair area has been planned.
- You know whether the repair needs backing or reinforcement.
During the repair
- Loose drywall has been removed.
- The opening has been properly prepared.
- The repair has appropriate support.
- Reinforcement has been properly embedded where required.
- Compound has been applied in controlled coats.
- The seams have been reinforced where applicable.
Before painting
- The repair is fully dry or set.
- The surface has been lightly sanded.
- The edges are smoothly feathered.
- There are no visible ridges.
- The repair has been checked under side lighting.
- Primer has been applied as appropriate.
- The wall texture matches.
- The paint and sheen match the surrounding wall.
Final Thoughts
A large hole in drywall does not automatically mean you need to replace the entire wall.
The right repair starts with evaluating the surrounding drywall and understanding what caused the damage.
If the surrounding board is sound, a properly reinforced repair may be enough.
If a larger section is missing, a backed drywall patch can provide a more rigid and controlled base.
Either way, the repair should be built from a stable foundation rather than simply buried under a thick layer of compound.
And once the structural part is complete, the finish matters just as much.
Reinforce the repair, build the surface gradually, feather the edges wide, inspect it from the side, and prepare the surface properly before paint.
That is how you turn a large, ugly drywall hole into a repair that blends back into the wall instead of creating another obvious patch.
Related Drywall Repair Guides
If you are dealing with a different type of drywall damage, these guides can help:
- Why Does My Drywall Repair Keep Cracking? — Learn why repairs fail repeatedly and what to check before patching the same crack again.
- Small vs. Medium vs. Large Drywall Holes: Which Repair Method Should You Use? — Choose the right repair approach based on the size and condition of the damage.
- How to Repair a Doorknob Hole in Drywall — A practical method for common door-impact damage.
- Why Does My Drywall Patch Still Show After Painting? — Find out why a repair can remain visible even after sanding and painting.
- How to Make Drywall Repairs Disappear Under Paint — Focus on feathering, sanding, primer, texture, and paint matching.
- Drywall Blowout Repair Guide — Learn how to approach damaged drywall without automatically turning the repair into a much larger patch.
- How to Fix Drywall Anchor Holes — A simpler approach for small holes left by shelves, pictures, and wall anchors.